
a.k.a. The USB Easy Button
It's A Fundamental Truth of Requirements Gathering that the longer you talk to someone about custom software, the more their answer boils down to two requirements:
- Make me a button called "Do My Job."
- Make it do my job.
Then they get thoughtful for a moment and add a third requirement:

- Make sure only I can press the button.
Some of them will even joke "You know, like an Easy Button."
Those Easy Buttons from Staples are awesome, but they have one small flaw: they don't actually do anything useful. It's my aim to change that.
Let's Make a Button!
What we need is an Easy Button Hack, so I'm going to build a USB Easy Button. I found most everything I needed from jro's project on instructibles and a flickr photoset by tommybear. Plus, I've been dying to try one of these U-HIDs.
What you'll need:
- An Easy Button (or Botón Fácil if it suits you better) $4.99
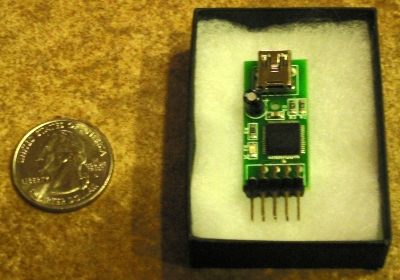
- A U-HID Nano and USB Cable (with shipping) $42.00
- A Modular Harness for the U-HID (optional) $9.00
- Soldering iron & solder
- Wire (if you didn't buy the wiring harness)
- Dremel or a chisel
- Hot glue or silicone
- Small phillips screwdriver
- PC running Windows XP
Step 1: Program your U-HID Nano
Plug the USB cable and wiring harness (if you're using it) into the U-HID Nano. If you're going to have the button send a single command like me, just leave the black (ground) wire and the gray (pin 10) wire long enough to reach the PCB. We won't be using the other 7. If you want to use the button to close more than one switch at a time (for example, to send "Ctrl + Alt + Del"), leave one wire per button, plus the ground wire.
I hooked the wires up to a temporary switch at this point for programming the thing. You could go ahead and hook it up to the Easy Button. Just scan down a little to see which contacts to use.
You program the U-HID Nano with U-Config, a software package available from the manufacturer. It's a pretty easy process, and the Technical Manual was easy to read.
I'm not going to go into the details here except to note that a driver install and firmware update were required to get it working on my machine. Both of those processes are clearly documented on their site. I set it up so that when pin 10 goes to ground, it will send the macro "L Alt, F8". It seems to send the scancodes fast enough that my machine counts it as a combination keypress.
Step 2: Take the Easy Button Apart
Turn the button over, and you'll see four black pads on the bottom. Pull them off to expose the screws. Be sure to save the pads so you can stick them back on. Go ahead and take the batteries out while you're there.
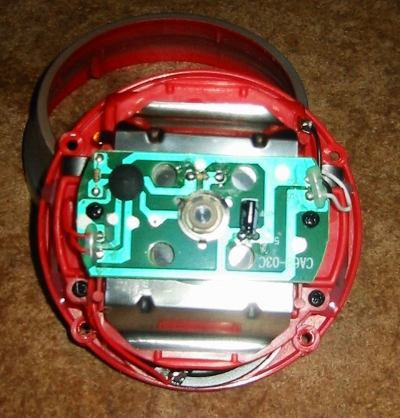
Remove all 4 screws to release the silver ring and red button from the assembly. You'll be left with just the guts of the machine. Inside, you should see a white button. That is the heart of the Easy Button and the only part of the original electronics we're actually going to make use of.
All of these things have to go, so desolder and discard them:
- The black capacitor
- The resistor closest to the button
- The red speaker wires
- The black & white power wires
If you don't know what those things are, don't sweat it. Take a look tommybear's photos on flickr. He's better at this than I am.
Remove the 2 screws, and take the PCB off of the assembly. Set the metal spring aside. We want to keep that because it gives us a satisfying CLICK when the button is pushed.
Remove the 4 screws that hold the little mezzanine level on. You may have to pry it up just a bit if the hot glue below is sticking it down. Take the metal slugs out and discard them. They're just stuck in there with a little hot glue and you can pick them out without ruining anything. I guess you could leave them if you have the room & like the heft. Remove the speaker too.
Use your dremel or a chisel to take out any little plastic bits that are in your way. Just remember that you have to leave the 4 posts that hold the mezzanine level up.
Step 3: Put the U-HID in the Easy Button


Find a way that the whole U-HID assembly will fit inside the button, then use some hot glue or silicone to stick it in place.
Replace the mezzanine, metal spring, and PCB. Now comes the soldering. The U-HID Nano is going to just sit there and wait for pin 10 to touch the ground pin. We're going to use the normally-open momentary switch inside the Easy Button to interrupt that connection, so the circuit is only closed while the Easy Button is depressed. Solder the gray and black wires as shown.
It would be a good idea to test it at this point to make sure it works before you put everything back together. Use a little hot glue to make sure the wires do not interfere with the holes in the PCB. Those are what keep the button aligned properly, and if they're blocked, you can't push the button.
Step 4: Let The Wire Out

Cut a slot in the silver ring that's just big enough for the wire to get out of the enclosure. I made mine a left-handed Easy Button (made to sit in the left side of the computer). You could hook yours up backward or cut a channel through the battery compartment and have it come straight out the "front."
Step 5: Replace the Ring and Button
It should only go back together one way: with the battery compartment farthest away from you, the "easy" label should be right-side up and the Staples logo on the ring will be directly toward you. Replace all 4 screws in the bottom of the case and use a little hot glue to stick the rubber pads back on. You're done with the hardware: you've built an Easy Button that actually does something.
Step 6: Write the Software that Actually Does Your Job
If you're able to buy software that does your job, you could use that too. Implementation of a security system so that only you can push your button is left as an exercise to the reader. For extra style points, make sure your software ends up playing a "That was easy" sound effect when the job is done.
Step 7: Assign a Hotkey to Your Software
If you are having the button send a key combination that is recognized by the system already (like Ctrl + Alt + Del), you can skip this step.
Create a folder in your Start Menu called "Easy Button" and create one shortcut inside the folder called "thatwaseasy.lnk". Right-click the shortcut and select Properties. Click the "Shortcut key" field and press the hotkey combination you told the Easy Button to send (in my case, Alt + F8). This shortcut has to be in your start menu or on your desktop. You can set the shortcut property of any shortcut, but it only works if the shortcut is in the right place.
TA DA!

For about $50 you could have one just like this. If you pay close attention to jro's project, you could use a recycled keyboard instead and do this for about $5. Now get out there and build your own.