Solving A Dove Problem

We made a small design mistake when we were installing our spa. It has a knife-edge border between the spa and the pool. It's like the Riviera for neighborhood doves, who like to dip stale bread in our water and poop on the tile.

Owl

1st Solution: Scary Fake Owl

Naturally, I wanted to prevent doves pooping in my pool. So I got this scary fake owl.

It didn't even work a little bit. If the doves noticed it all, it just helped them relax and move their bowels more freely.

2nd Solution: Scary Real Dog

When we were having some plumbing work done inside and outside our house at the same time, I parked a 90 pound dog inside the pool fence. I figured she would scare the doves away for at least a little while.

It didn't even work a little bit. She slept calmly in the shade and the doves seemed glad for the company.

3rd solution: A Slingshot

Slingshot

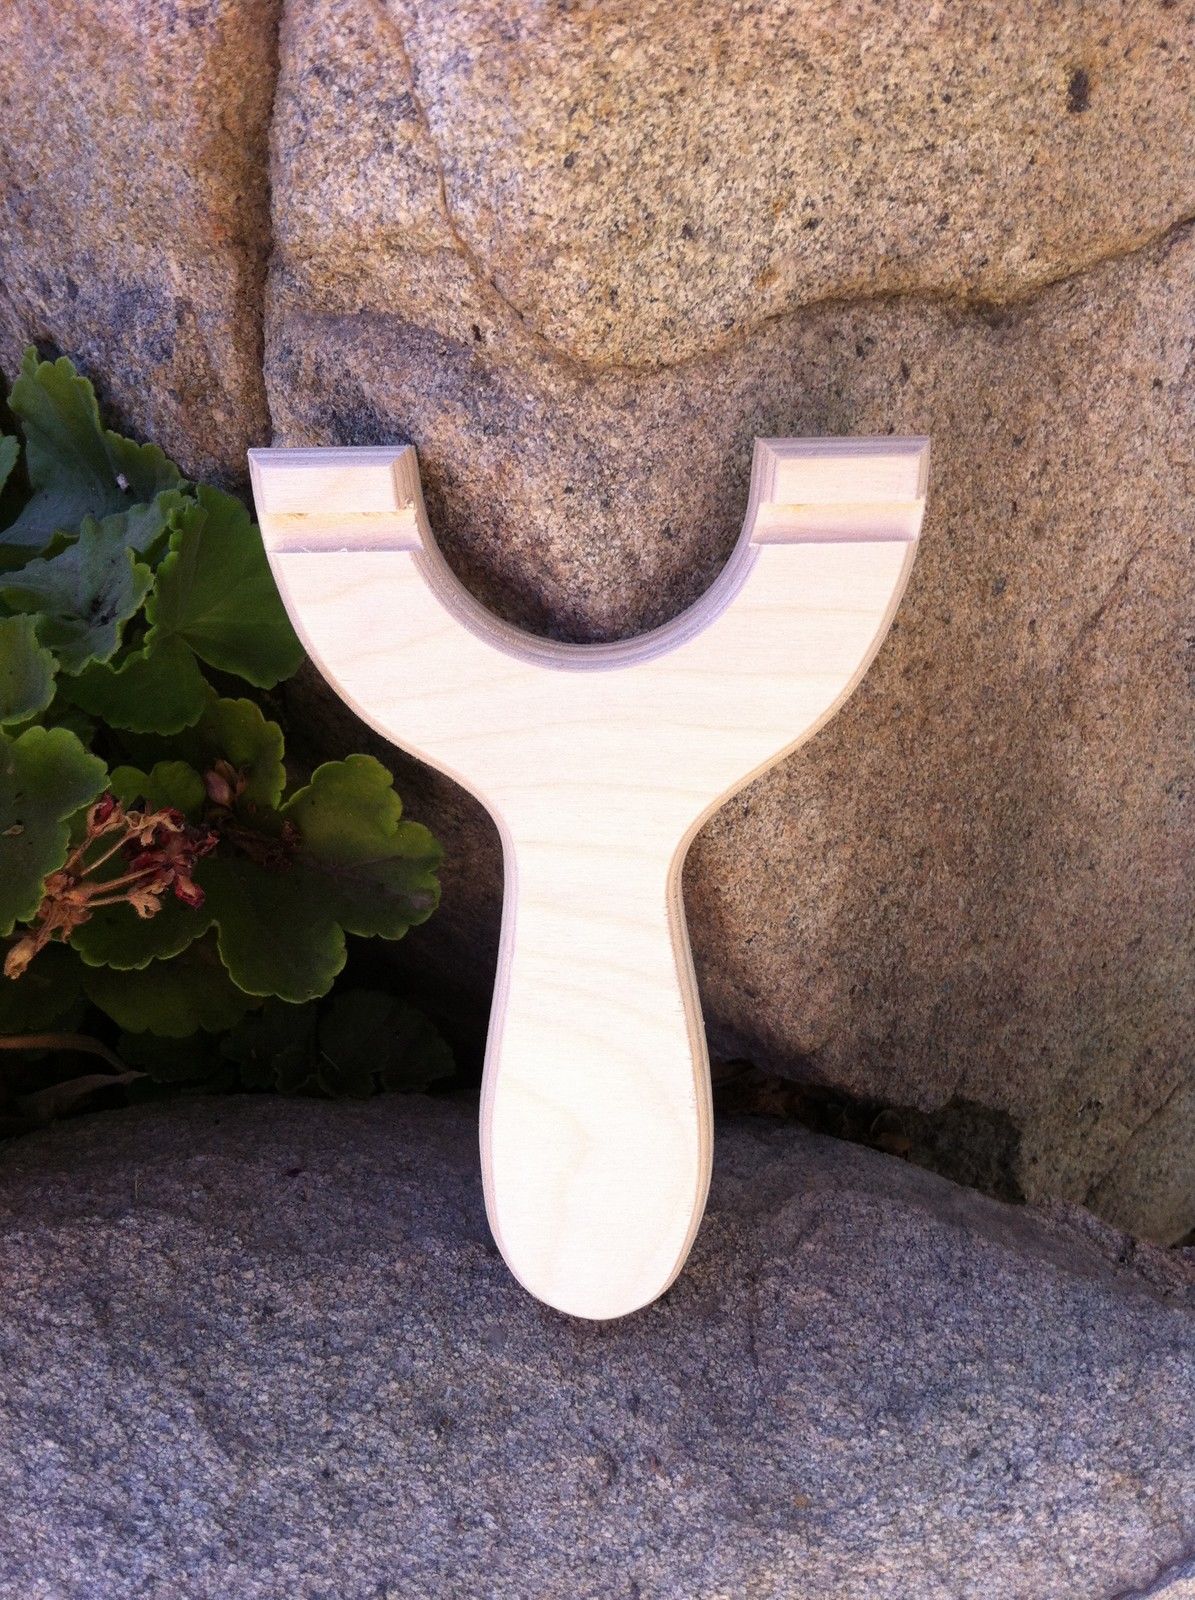
I went on eBay and bought a "hunting slingshot." The slingshot is plenty powerful to destroy a dove, but there are 2 problems with that: 1) a missed shot would probably break a pool tile and 2) cleaning up dove carcasses is not much better than cleaning up dove poop.

So I got really light-weight ammo: Airsoft BBs weigh in at a fifth of a gram and they can't really do much damage. I also have some practice ammo. They're also lightweight and mostly harmless, but they bounce really far when they hit a hard surface.

This actually worked well. You don't even have to hit a dove. If a fast-moving projectile hits anywhere near one of them, they all fly off in a rush.

2nd Problem: Doves are quite stupid

It turns out you can hit doves with airsoft bbs over and over and over again, and they keep coming back. They just land on a power line above the alley and wait a minute. Then they all descend on the pool again.

I deem this problem unsolvable.

Chess!

My son has been in his school chess club since preschool. He loves playing it. I’m not very good at it (he’s 6 and can beat me sometimes), but there’s one thing I’ve always loved: big garden chess boards that you walk around on top of to move big chess pieces. So I decided to build one.

The Design

I decided to build the pieces out of flat stock because it’s easy to get, affordable, and I know how to work it. I decided on a hinged base so they would fold and lay flat.

Aside: I discovered http://amazonsupply.com/ during this project. It's awesome!

My son helped me design the pieces. He drew what he thought they should look like on Post-It notes and I sketched them on big butcher paper to make templates. The King is three feet tall. The Pawns are 2 feet tall and everything else is somewhere in between. It only takes 6 templates to make all 32 pieces, so that went pretty quick.

Then we traced the templates on to 1x8” pine. I bought 6’ pre-cut boards of select grade stuff and put 2 tall pieces or 3 pawns on a board.

Cutting

This part takes a while. You have to carefully cut 32 pieces out of 8” boards with a jigsaw or bandsaw. I bet if I had a bandsaw, I could cut out a stack of 2-4 pieces at a time. I don’t have a bandsaw. I bet if I transferred the templates to a piece of hardboard first, I could have cut them using a straight-cutting router bit with a guide bearing. I didn’t do that. I cut all 16 pawns the hard way.

Then I sanded everything and routed the edges so they’re rounded over. It makes the pieces feel nice in the hand.

Painting

My son picked the colors. He said the white side should match the rocks in our back yard and the black side should match the pool fence. He got his design skills from his mom. We put drop-cloths in the yard and put 1 coat of primer followed by 2 coats of paint on both sides of all 64 pieces (including bases). This was a good family part of the project: no power tools or loud noises, just a lot of painting.

That's a philips-head screw he's holding. I'm not actually drilling a hole in my son's hand.

Assembly

This was another good family part of the project. Each piece needed a hinge attaching the base to the figure. Then each base needed an angle bracket and each figure needed a threaded insert. When you stand the piece up, a thumb screw goes through the bracket and into the insert.

The Board

The base of each piece is 9¼” wide. I went with 12” pavers to be the black squares on my board. The white squares are just the same gravel as the rest of the yard. It didn’t look quite right until I added the border of bricks all the way around. It makes it look like the white squares along the edges are part of a chess board, not encroaching yard.

Playing

Dude. It’s strangely satisfying to walk around on top of a chess board, stepping between the pieces, looking at the game from different angles. Then you pick up a rook and walk it 6 feet. It’s really fun even if you’re not good at chess.


All together, this set took about 10 weekends of work (not totally full, just... a lot of work), but I'm glad I did it.

Cherry Tower Desk

Sometimes I make the joke that I build stuff because there’s stiff competition: my wife made two people. I’m just trying to keep up. We need a new desk. My wife really liked Ana White’s Parson Tower Deskand she bought me a Kreg Jig (she’s the best!). I liked the construction technique, but the dimensions were a little off for us. I also tweaked the materials.

I found great 30” cherry wood turning blanks at Woodworker's Source. They're 2” x 2” square and surfaced on all 4 sides. They are a little pricey (especially since I needed like 16 of them for this project), but I don't have a planer or jointer at home, so I needed something already surfaced for a nice clean fit. They also had a gorgeous sheet of ¾” cherry plywood to make the shelves.

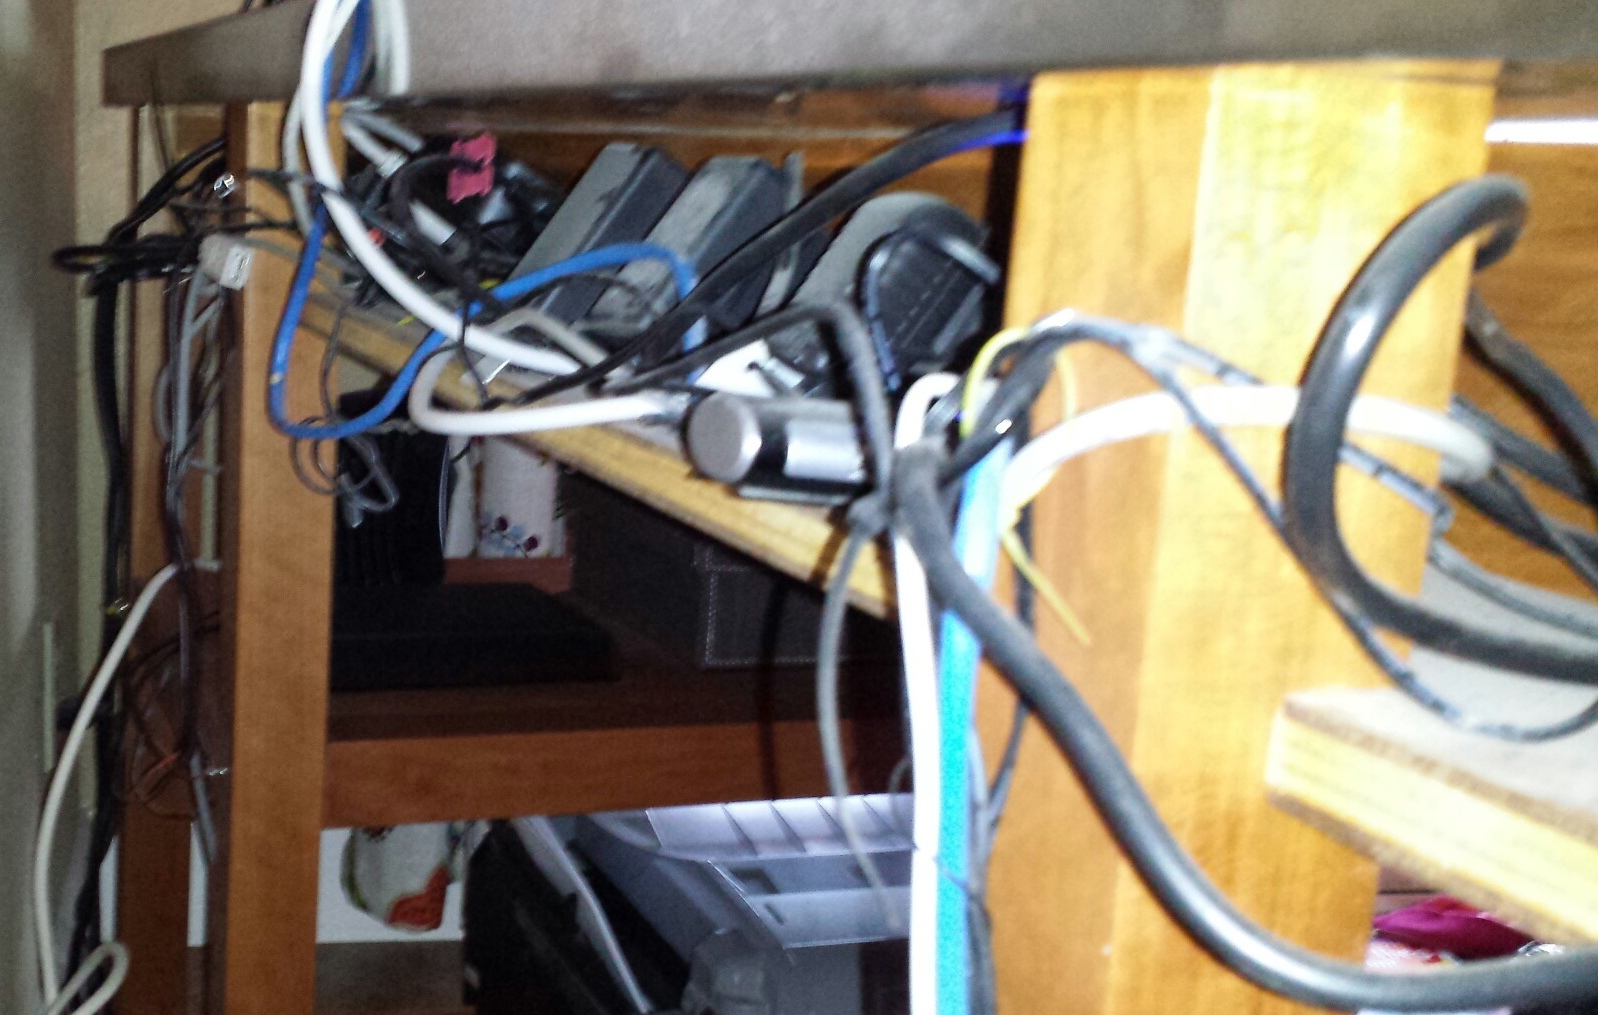
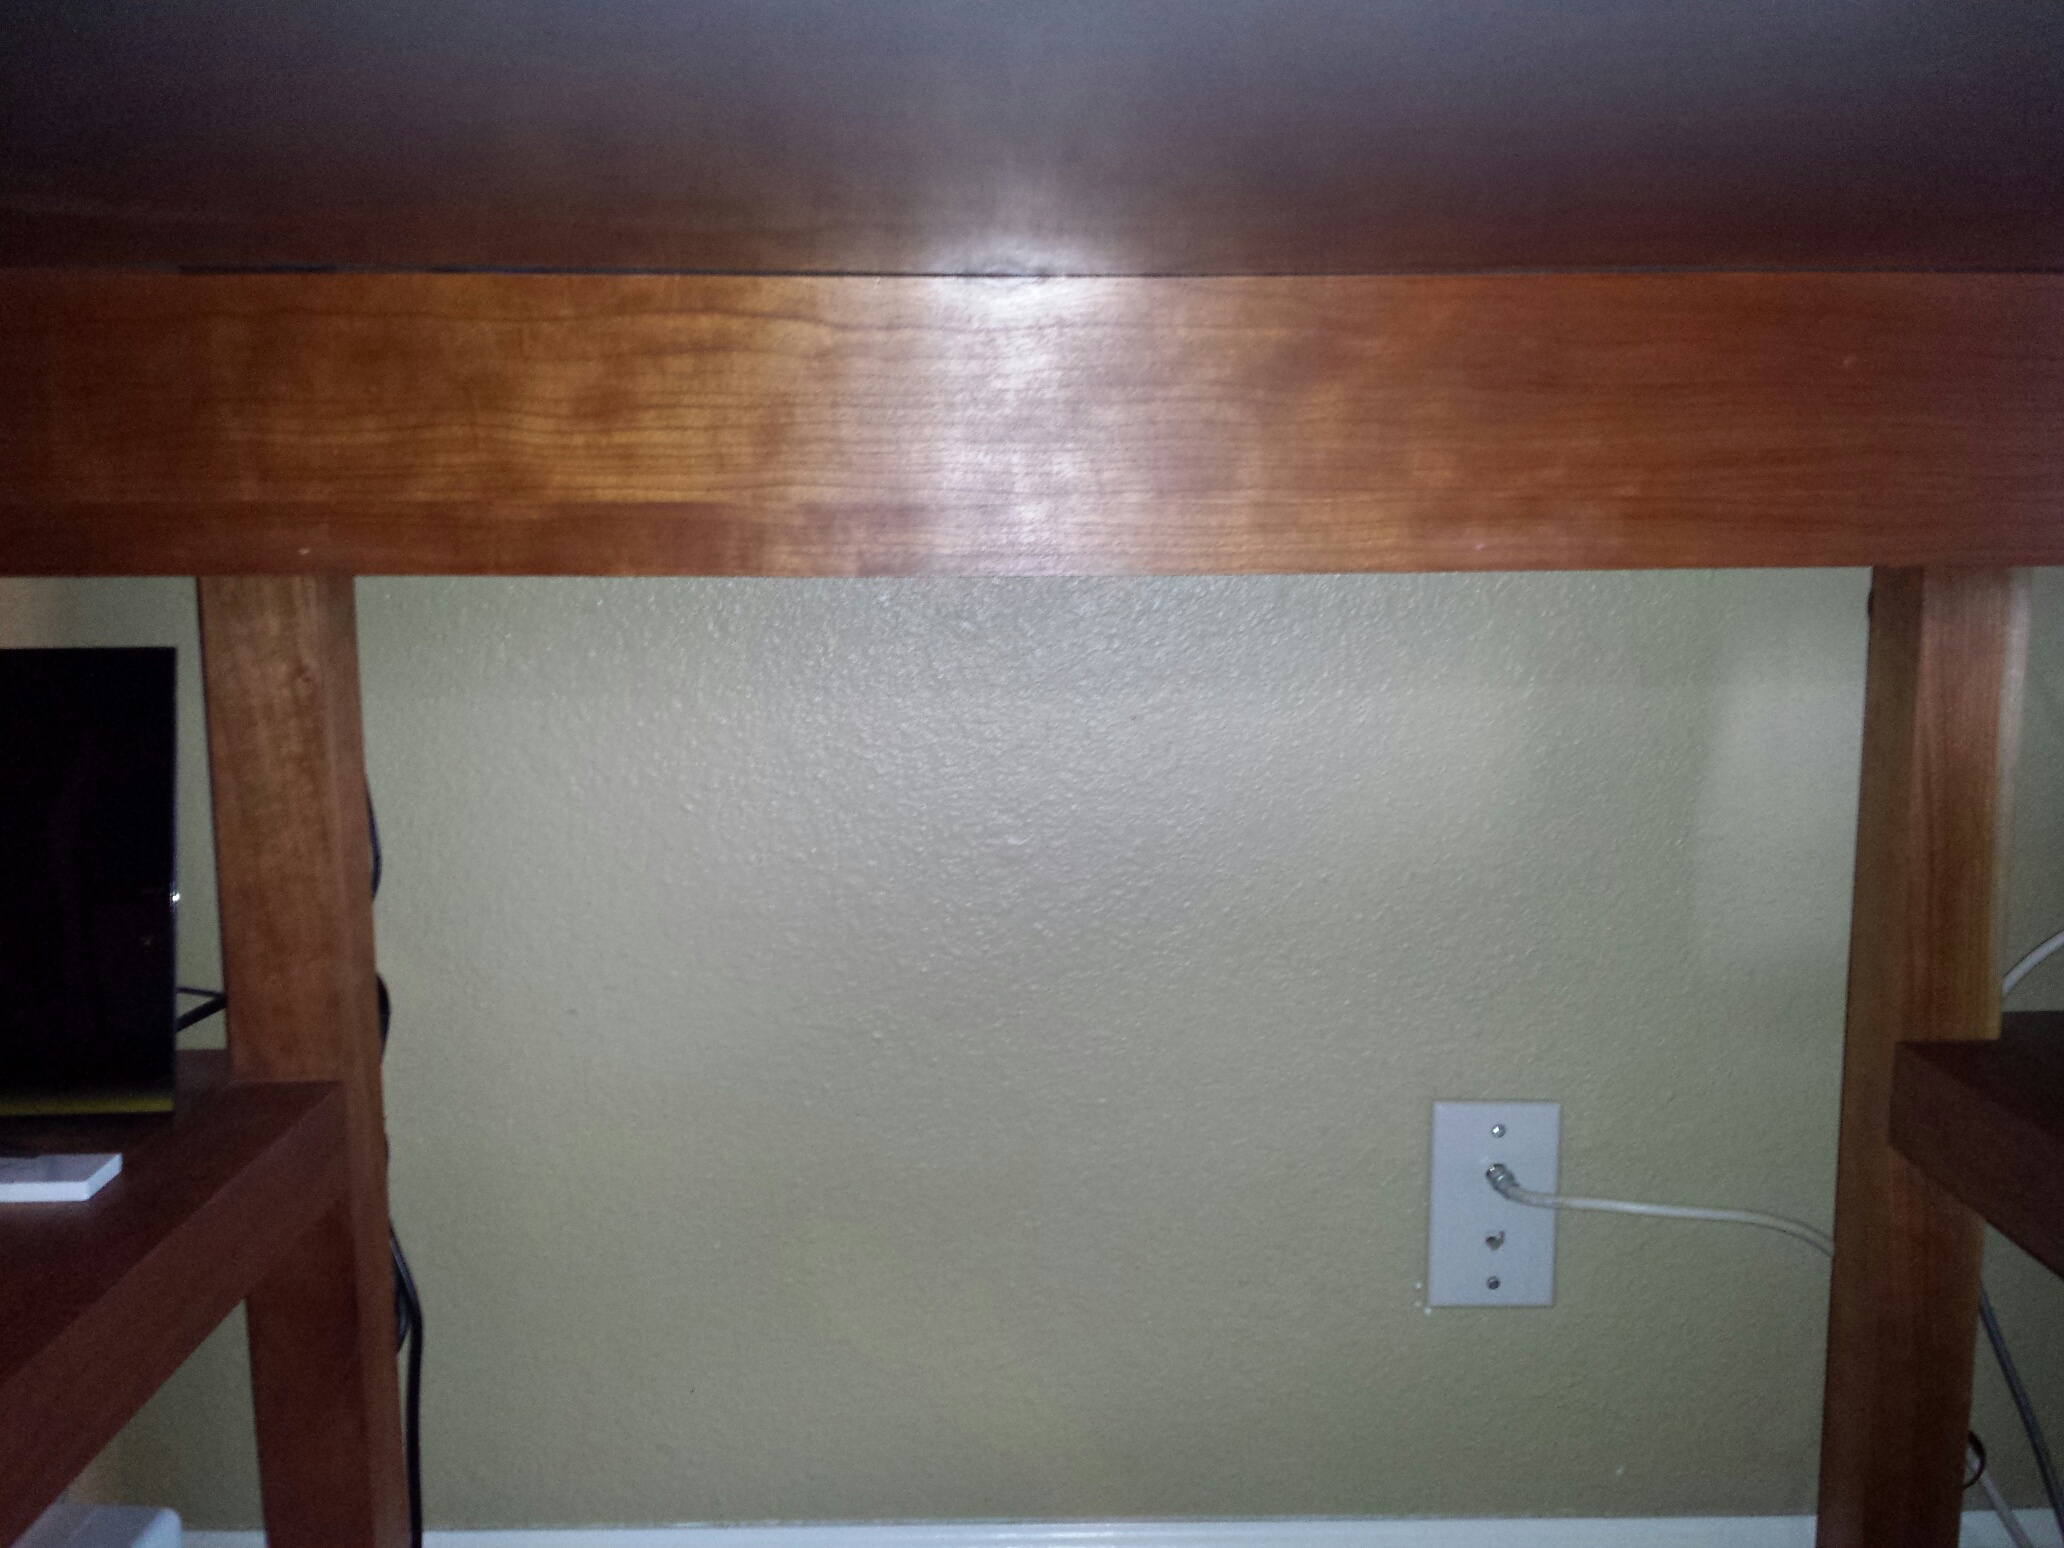
I'm particularly proud of this little feature: I added a cable tray underneath the back edge of the desk and I got a Big power strip that stays in there. Everything is plugged in to the strip, so there’s just one power cord coming off the back corner of the desk. The back still looks like this:

 
nest of snakes
 

But the front looks like this:

 
Nice & pretty
 

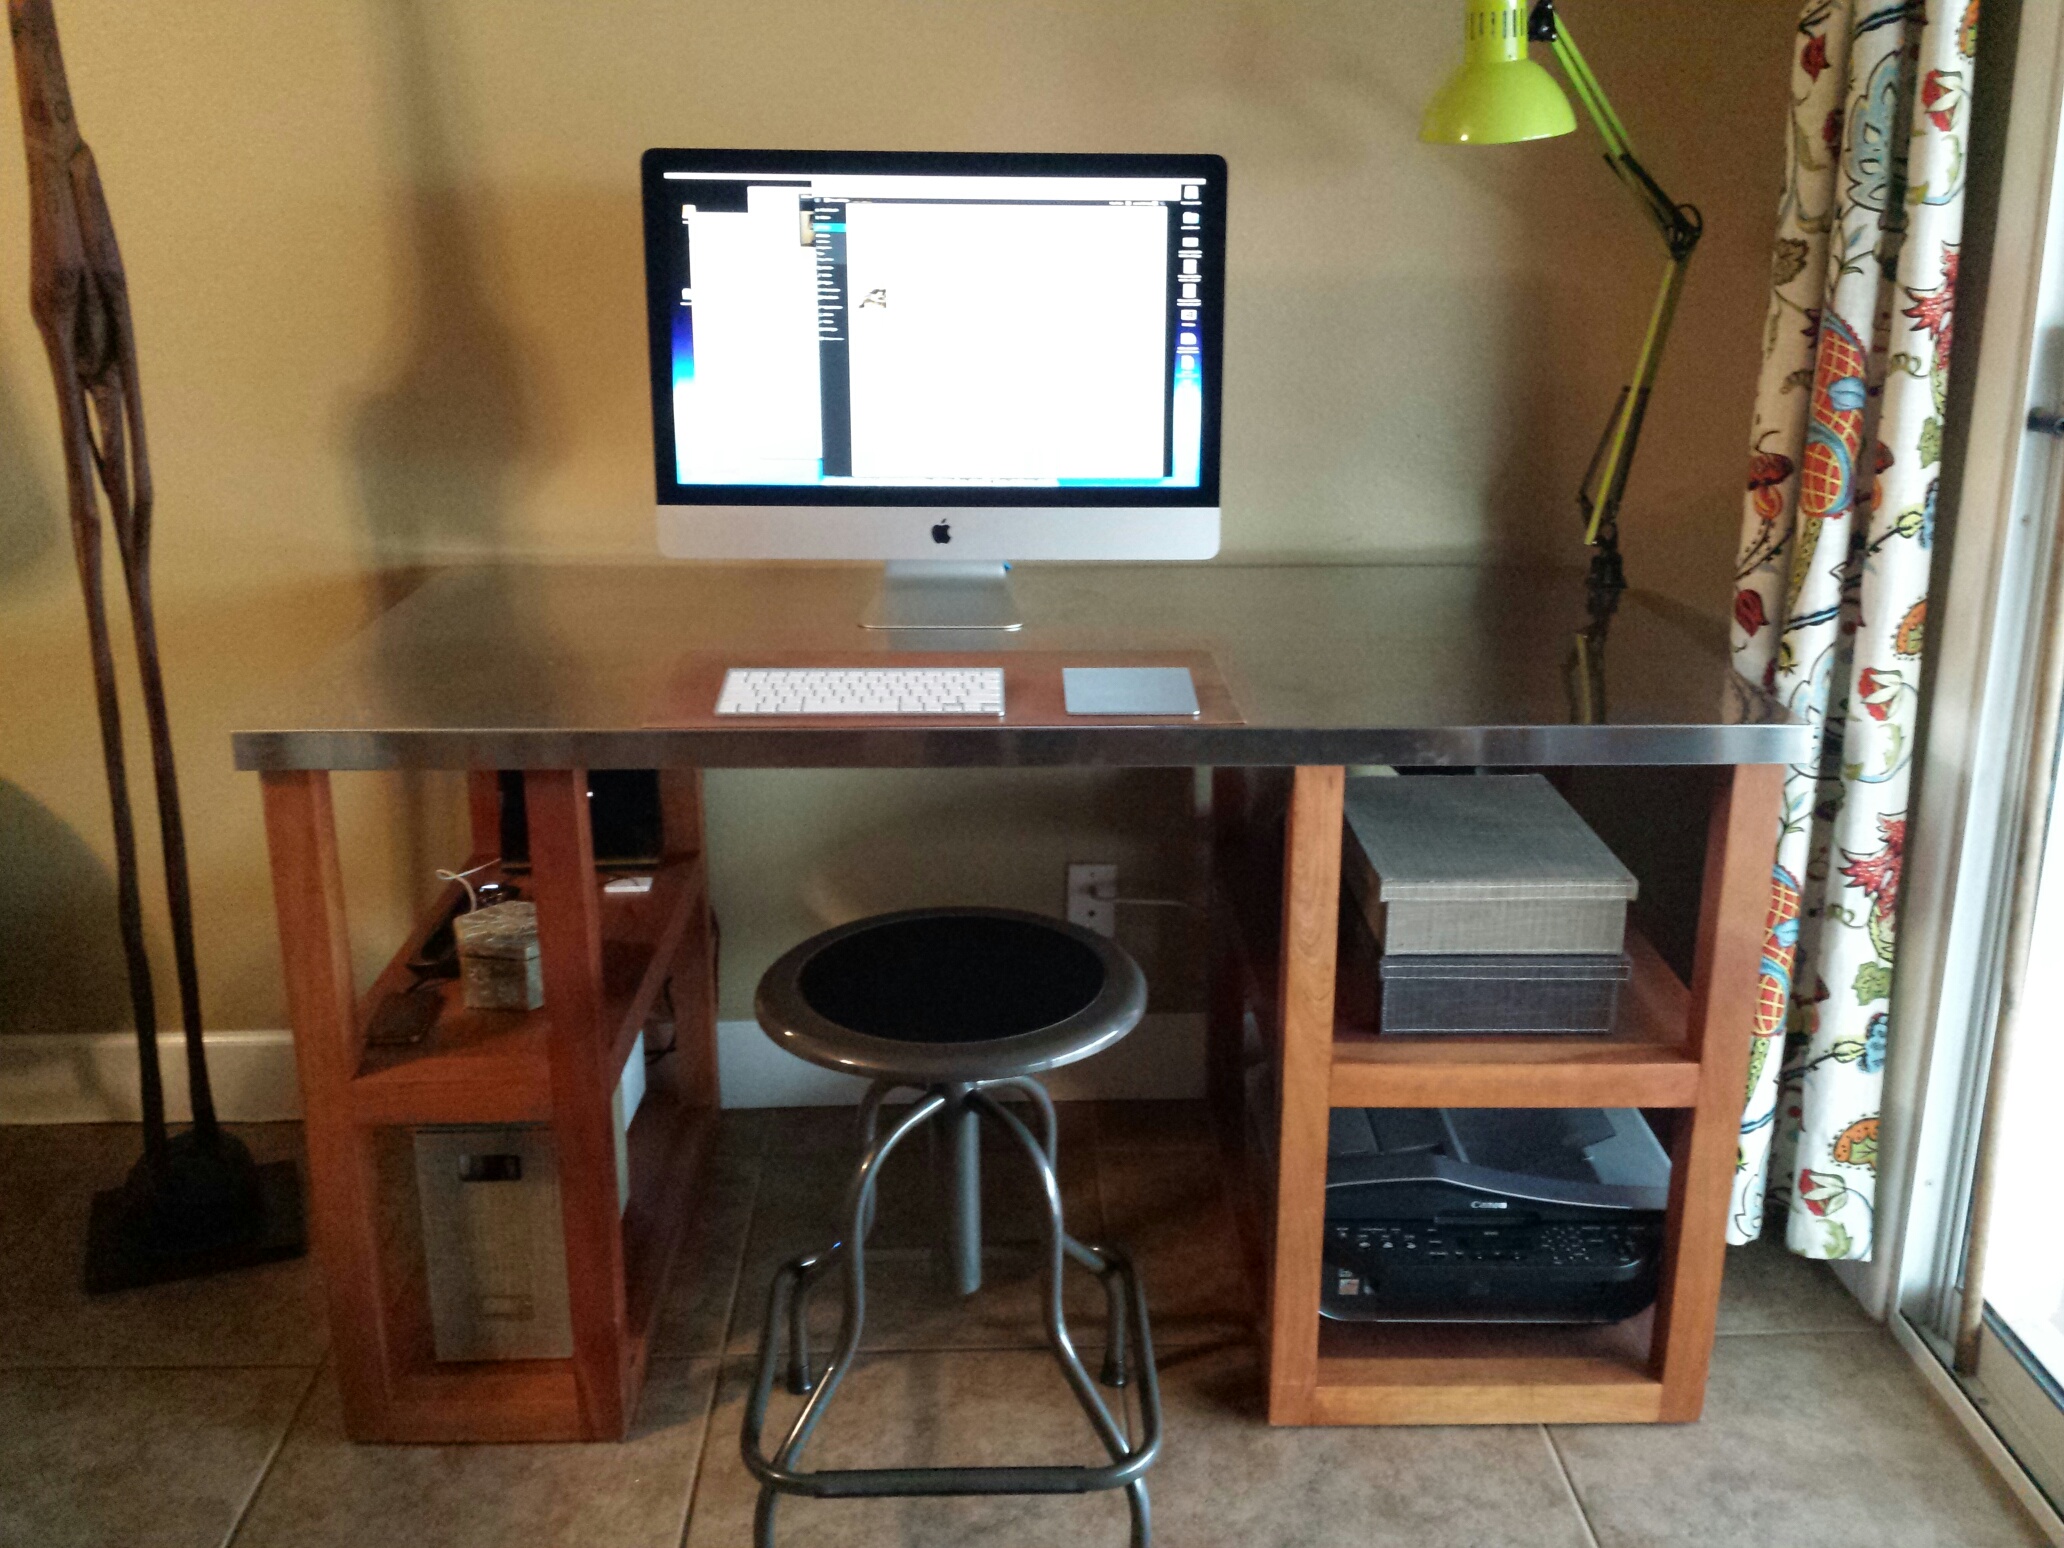
My wife found a stainless desktop at Ikea. I think its name is SANFRID. Put it all together and add several coats of Maloof oil/poly blend, and you get a desk!

 
Finished Desk
 

I still don’t feel like this evens things up. My wife made two people. All I made was a desk.

Coffee Shrine

There are few things in life to which I am more devoted than coffee. For me, the proper way to show devotion is maniacal control over as much of the coffee production process as I can muster.  And that means a coffee roaster. And a coffee roaster has to live outdoors so the smoke doesn't kill your family or pets.

We had this really useful little (little!) counter outside our kitchen window. I put a half-screen on the window, so we can use it as a pass-through from the kitchen to the back yard. I want to make that into a huge counter over spacious cabinets.

I assembled and leveled the cabinets on adjustable feet to keep them off the ground. I added a power strip inside so I could leave everything plugged in. Then I put plywood and backer board over the whole thing, rented a tile saw and tiled it with 20” ceramic tile and a fetching bull-nose around the edge.

I think this shows an appropriate level of devotion.

Go to Stanley's Immediately

Now look, this is very easy:

  1. Go to Stanley's Homemade Polish Sausage on McDowell Rd in Phoenix.
  2. Approach the woman behind the counter and say "I'd like some bacon, please." Be firm, but polite. Do not risk losing your Stanley's privileges.
  3. Take the bacon home, remove the skin, and cook it.
  4. Eat it.
StanleyBacon
StanleyBacon

It's awesome. Meaty like ham. Not at all salty, not sweet, and nicely smoky. Buy more than you need because you'll eat more than you should.

Weekend Project: Book Rack

I've been reading Knock-off Wood a lot lately, and they had these plans for a book rack. They're great for my girl's room for three reasons:

  • The books face straight out (so you can see 'em)
  • It sits flat to the wall (12"), so I can put it behind her door.
  • It's sturdy enough that she could climb it (not that she should)

Here's the finished product:

I deviated from the original plans in a few places:

  • No arches. I didn't want to cut them so I tell myself they didn't match her room anyway.
  • Routed outside edges and rails dress it up a bit
  • Taller shelves (15" instead of 12")
  • Notches for her chair rail & baseboards

I'm particularly happy with how the baseboards came out, but I sort of messed one thing up: when I routed the outside edges, I didn't stop at the baseboards. The round-over goes all the way to the floor. Whoops.

This was a great project. It took me 2 days of carpentry (with the assistance of a 5-year-old), plus a day of painting.  I spent about $90 on materials & a few tools that made it go smoother. I'd recommend it of you have an unused wall in your place.

There, I Solved It

I was inspired by http://thereifixedit.com. I feel a kinship with the innovators whose work is featured there. After all, I just expanded my universal remote, and they built one from scratch. I decided to document my own attempts at problem solving. Hopefully the engineering is better than theirs, but I feel confident my problems had less reason to be solved in the first place.

The Problem

Sometimes I forget to close my garage door. I've left it open all day and all night. This is a perfect example of a problem that barely needed to be solved in the first place. Right in my wheelhouse.

Solving It

What I need is an unmissable indicator of my forgetfulness. I'm thinking of a light that comes on when the garage door is open.  Ideally, one that I can see while watching TV or laying in bed.

Design

The concept is simple: That's right, I use MS-Paint for circuit diagrams.There's an LED, a power source, a switch, and a couple resistors.

Parts

The switch is a magnetic reed switch. It's normally open, but if a magnet cozies up to it, it gets all closed. Perfect. I don't know the model number, because I just found it in my garage, left over from when they installed the security system. You could get one for about $3, and you could go wireless for $50.

The power source is a couple of AAA batteries. I happened to have a battery holder that size lying around, so that's what I went with. I think you could get a new one for $2.

The LED is a panel mount model I bought just for this. It is green, and snaps into a 1/4" hole.

According to my math, I need a minimum of 40 Ω of resistance to avoid burning up my LED @ 3V. All I had were a couple of 100 Ω resistors, so I went with that. In parallel, that gives me 50 Ω plus the resistance of the wire & switch, so I won't burn the LED up.

Then there's some miscellaneous wire, solder and heat-shrink tubing to keep everything neat. Oh, and a magnet. I happened to have one of those too.

Assembly

Most of the stuff sits inside the house. I picked out a nice location in a closet and drilled a hole for the LED. I soldered up the battery pack, resistors, LED, and the leads to the switch and fed them through into the garage.

At the other end, I just had to stick the switch in place and mount the magnet to the garage door. And by "mount," I mean "stick it to the garage door because it's a magnet."

Victory is Mine

After just a little tweaking to get the position of the magnet just right, I have a working light. It has already reminded me to close the garage door once, and I expect it will have a long life saving me from myself.

The "Do My Job" Button

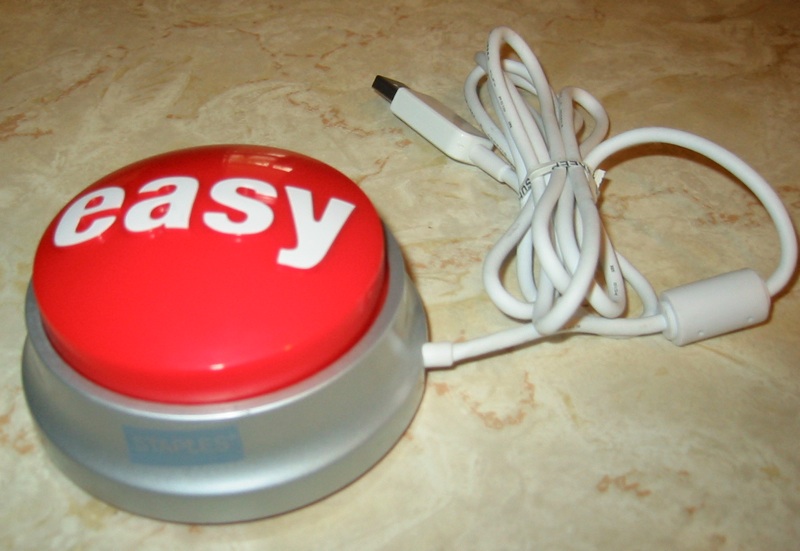
a.k.a. The USB Easy Button

It's A Fundamental Truth of Requirements Gathering that the longer you talk to someone about custom software, the more their answer boils down to two requirements:

  • Make me a button called "Do My Job."
  • Make it do my job.

Then they get thoughtful for a moment and add a third requirement:

  • Make sure only I can press the button.

Some of them will even joke "You know, like an Easy Button."

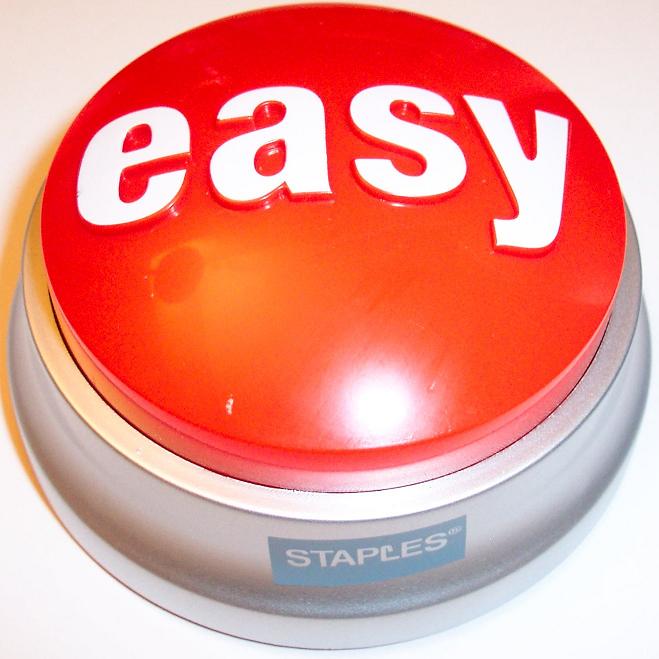
Those Easy Buttons from Staples are awesome, but they have one small flaw: they don't actually do anything useful. It's my aim to change that.

Let's Make a Button!

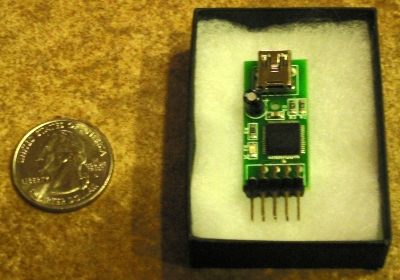
What we need is an Easy Button Hack, so I'm going to build a USB Easy Button. I found most everything I needed from jro's project on instructibles and a flickr photoset by tommybear. Plus, I've been dying to try one of these U-HIDs.

What you'll need:

  • An Easy Button (or Botón Fácil if it suits you better) $4.99
  • A U-HID Nano and USB Cable (with shipping) $42.00
  • A Modular Harness for the U-HID (optional) $9.00
  • Soldering iron & solder
  • Wire (if you didn't buy the wiring harness)
  • Dremel or a chisel
  • Hot glue or silicone
  • Small phillips screwdriver
  • PC running Windows XP

Step 1: Program your U-HID Nano

Plug the USB cable and wiring harness (if you're using it) into the U-HID Nano. If you're going to have the button send a single command like me, just leave the black (ground) wire and the gray (pin 10) wire long enough to reach the PCB. We won't be using the other 7. If you want to use the button to close more than one switch at a time (for example, to send "Ctrl + Alt + Del"), leave one wire per button, plus the ground wire.

IMG_0683

I hooked the wires up to a temporary switch at this point for programming the thing. You could go ahead and hook it up to the Easy Button. Just scan down a little to see which contacts to use.

You program the U-HID Nano with U-Config, a software package available from the manufacturer. It's a pretty easy process, and the Technical Manual was easy to read.

I'm not going to go into the details here except to note that a driver install and firmware update were required to get it working on my machine. Both of those processes are clearly documented on their site. I set it up so that when pin 10 goes to ground, it will send the macro "L Alt, F8". It seems to send the scancodes fast enough that my machine counts it as a combination keypress.

Step 2: Take the Easy Button Apart

Turn the button over, and you'll see four black pads on the bottom. Pull them off to expose the screws. Be sure to save the pads so you can stick them back on. Go ahead and take the batteries out while you're there.

IMG_0690

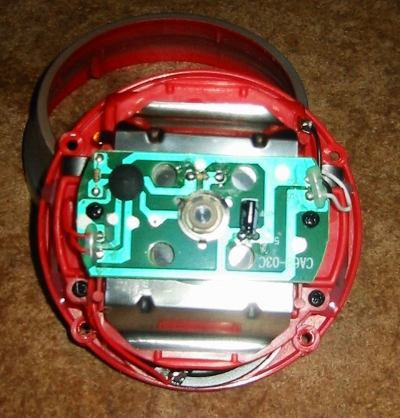
Remove all 4 screws to release the silver ring and red button from the assembly. You'll be left with just the guts of the machine. Inside, you should see a white button. That is the heart of the Easy Button and the only part of the original electronics we're actually going to make use of.

All of these things have to go, so desolder and discard them:

  • The black capacitor
  • The resistor closest to the button
  • The red speaker wires
  • The black & white power wires

If you don't know what those things are, don't sweat it. Take a look tommybear's photos on flickr. He's better at this than I am.

Remove the 2 screws, and take the PCB off of the assembly. Set the metal spring aside. We want to keep that because it gives us a satisfying CLICK when the button is pushed.

Remove the 4 screws that hold the little mezzanine level on. You may have to pry it up just a bit if the hot glue below is sticking it down. Take the metal slugs out and discard them. They're just stuck in there with a little hot glue and you can pick them out without ruining anything. I guess you could leave them if you have the room & like the heft. Remove the speaker too.

Use your dremel or a chisel to take out any little plastic bits that are in your way. Just remember that you have to leave the 4 posts that hold the mezzanine level up.

Step 3: Put the U-HID in the Easy Button

IMG_0694
IMG_0695

Find a way that the whole U-HID assembly will fit inside the button, then use some hot glue or silicone to stick it in place.

Replace the mezzanine, metal spring, and PCB. Now comes the soldering. The U-HID Nano is going to just sit there and wait for pin 10 to touch the ground pin. We're going to use the normally-open momentary switch inside the Easy Button to interrupt that connection, so the circuit is only closed while the Easy Button is depressed. Solder the gray and black wires as shown.

It would be a good idea to test it at this point to make sure it works before you put everything back together. Use a little hot glue to make sure the wires do not interfere with the holes in the PCB. Those are what keep the button aligned properly, and if they're blocked, you can't push the button.

Step 4: Let The Wire Out

Cut a slot for the wire

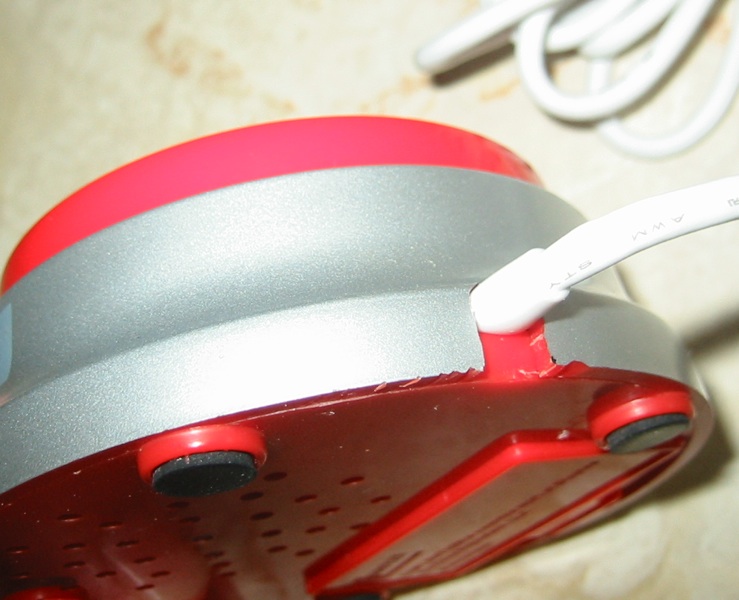
Cut a slot in the silver ring that's just big enough for the wire to get out of the enclosure. I made mine a left-handed Easy Button (made to sit in the left side of the computer). You could hook yours up backward or cut a channel through the battery compartment and have it come straight out the "front."

Step 5: Replace the Ring and Button

It should only go back together one way: with the battery compartment farthest away from you, the "easy" label should be right-side up and the Staples logo on the ring will be directly toward you. Replace all 4 screws in the bottom of the case and use a little hot glue to stick the rubber pads back on. You're done with the hardware: you've built an Easy Button that actually does something.

Step 6: Write the Software that Actually Does Your Job

If you're able to buy software that does your job, you could use that too. Implementation of a security system so that only you can push your button is left as an exercise to the reader. For extra style points, make sure your software ends up playing a "That was easy" sound effect when the job is done.

Step 7: Assign a Hotkey to Your Software

If you are having the button send a key combination that is recognized by the system already (like Ctrl + Alt + Del), you can skip this step.

Create a folder in your Start Menu called "Easy Button" and create one shortcut inside the folder called "thatwaseasy.lnk". Right-click the shortcut and select Properties. Click the "Shortcut key" field and press the hotkey combination you told the Easy Button to send (in my case, Alt + F8). This shortcut has to be in your start menu or on your desktop. You can set the shortcut property of any shortcut, but it only works if the shortcut is in the right place.

TA DA!

A Finished USB Easy Button

For about $50 you could have one just like this. If you pay close attention to jro's project, you could use a recycled keyboard instead and do this for about $5. Now get out there and build your own.

Win32::AmbientOrb

This page describes a Perl module I wrote to support a serial-port controlled Ambient Orb. See the Original Post for details. If you just want to get the package, you can download it directly or grab a PPD.

Manipulate an Ambient Orb through a serial port

NAME

Win32::AmbientOrb - Manipulate an Ambient Orb through a serial port

SYNOPSIS

  use Win32::AmbientOrb;

EXAMPLE

  use Win32::AmbientOrb qw(:ALL);

  my $port = "COM1:";
  Win32::AmbientOrb::Port($port); #set port to COM1
  InitializePort();               #set serial port settings
  PagerIgnore(1);                 #don't listen to the pager network

  # go straight to red
  my @red = (176, 0, 0);
  DirectColor(\@red);

  # quick transition from blue to red
  my @blue = (0, 0, 176);
  TransitionColor(\@blue, \@red, 20, 5);

  # slow transition from red to blue
  TransitionColor(\@red, \@blue, 50, 100);

  # clean up
  CloseOrb();

DESCRIPTION

The Win32::AmbientOrb module lets you manipulate an Ambient Orb connected to a Win32 machine through a serial port.

It uses Win32::SerialPort for serial port communication.

EXPORTED HASHES

Two hashes are exported by default, %OrbColor and %OrbRGB.

%OrbColor
Maps from color names to Color IDs useful for ColorAnim( ). Available color names are:

 • Red          => 0
 • LightRed     => 1
 • DarkOrange   => 2
 • Orange       => 3
 • LightOrange  => 4
 • DarkYellow   => 5
 • Yellow       => 6
 • LimeGreen    => 7
 • PaleGreen    => 8
 • GreenMinus3  => 9
 • GreenMinus2  => 10
 • GreenMinus1  => 11
 • Green        => 12
 • GreenPlus1   => 13
 • GreenPlus2   => 14
 • PaleAqua     => 15
 • Aqua         => 16
 • DarkAqua     => 17
 • Cyan         => 18
 • DarkCyan     => 19
 • LightBlue    => 20
 • SkyBlue      => 21
 • BlueMinus2   => 22
 • BlueMinus1   => 23
 • Blue         => 24
 • DeepBlue     => 25
 • VeryDeepBlue => 26
 • Violet       => 27
 • Purple       => 28
 • LightPurple  => 29
 • Magenta      => 30
 • MagentaPlus1 => 31
 • MagentaPlus2 => 32
 • MagentaPlus3 => 33
 • MagentaPlus4 => 34
 • MagentaPlus5 => 35
 • White        => 36
%OrbRGB
Contains the mapping of color ids to RGB arrays useful for DirectColor( ).

METHODS

Port( [$port] )
Sets or returns the port that the Ambient Orb is connected to. Default is COM1:

InitializePort( )
Initializes the serial port for communication with the Ambient Orb. Settings are:

 • BAUD: 19200
 • PARITY: N
 • DATA: 8
 • STOP: 1
ClosePort( )
Cleans up the port object.

ColorAnim( [$color], [$animation] )
Changes the color of the Orb using the default color and animation settings. Colors are listed above in %OrbColor Animations are 0-9

        ANIMATION
 • 0 almost imperceptibly slow
        ...
 • 7 very fast
 • 8 crescendo effect
 • 9 heartbeat effect
DirectColor( \@rgb )
Sets the orb instantly to the color specified in the 3-element array @rgb. Red, green and blue values should be between 0 and 176.

TransitionColor( \@rgb0, \@rgb1, $steps, $wait )
Performs a slow transition from the color in @rgb0 to the one in @rgb1. Sets the orb instantly to the color specified in the 3-element array @rgb0, then sends $steps updates, one update every $wait milliseconds until it reaches the color specified in @rgb1. Red, green and blue values should be between 0 and 176.

PagerIgnore( $ignore )
Instructs the orb not to listen to the pager network. If you don't call this, the orb will keep changing its color to reflect whatever channel it was listening to before you plugged in the serial port.

AUTHOR

Andy Allen

Orb Walkthrough

This page goes through how to set up your serial-controlled orb. The sections are: What You Will NeedConnecting the HardwareInstalling Perl and Required PackagesCreating a Color ScriptInstalling the ServiceWeb-Connected OrbsOther Uses For the Orb

You Will Need:

HARDWARE

SOFTWARE

  • Perl (I used ActiveState). I've included ppm commands below.
  • Aldo Calpini's Win32::API package ppm install Win32-API
  • Dave Roth's Win32::Daemon package ppm install http://roth.net/perl/packages/Win32-Daemon.ppd
  • Bill Birthisel's Win32::SerialPort package I didn't use a ppd, I installed it the old-fashioned way (as described in the README, but you could try finding a ppd with a Google search
  • Win32::AmbientOrbppm install http://powerfulmojo.com/tools/ppm/Win32-AmbientOrb.ppd
  • The service files in AmbientOrbService.zip

Connecting the Hardware

  • Plug the serial exension cable (if you're using one) into your serial port.
  • Plug the HDK into the serial extension cable
  • Plug the Orb into the HDK.
  • Plug the Power adapter (supplied with the Orb) into the HDK.

The orb will go through its regular power-up routine, then start displaying the DJIA channel (or whatever it was most recently tracking).

Installing Perl and Packages

Install Perl and get all of the packages above installed in the order listed. If you use the ppm commands provided, it will link the modules' documentation right into your html documentation so you can see how to use everything. You will only be using Win32::AmbientOrb directly. It depends on Win32::SerialPort (which depends on Win32::API), and we will need Win32::Daemon to get it up and running as a service.

Creating a color script

The service will need a script to tell it what color to turn the orb. A color script can be written in just about any language, it just has to print an integer to the console representing the correct color. Possible colors are:

0 Red 24 Blue
3 Orange 27 Violet
6 Yellow 30 Magenta
12 Green 35 Red-Magenta
18 Cyan 36 White

You can use any integer between 0 and 36. The ones I didn't list work out about like you'd expect (i.e. 9 is yellowish-green). My color script is in Perl and is available below. A blue orb means all builds are successful, a red orb means at least one build is failed, and a yellow orb means the CruiseControl server was unreachable.

Here is an example of a (very simple) batch file color script:

@echo 24

It's not very interesting, because it just returns the code for "blue." The default script looks like this:


 1   #!perl
 2   use strict;
 3   use LWP::Simple;
 4
 5   my $color = getColor();
 6   print $color;
 7
 8   sub getColor {
 9       my $color = 6;
 10      for (my $retry = 0; $retry < 3; $retry++) {
 11          if ($color == 6) {
 12              sleep 1 if ($retry > 0);
 13              $color = getColorRequest();
 14          }
 15      }
 16      return $color;
 17  }
 18
 19  sub getColorRequest  {
 20      my $color;
 21      my $dashboard = get('http://cchost/ccnet');
 22      if ($dashboard) {
 23          if ($dashboard =~ />Fail/) { $color = 0; }
 24          else { $color = 24; }
 25      }
 26      else {
 27          $color = 6;
 28      }
 29      return $color;
 30  }

It is a little more interesting: it makes a request to a server named cchost and searches the response for the word "Fail." If it finds it, at least one build is failed and the orb should be red. If no builds are failed, the orb should be blue. In the event that the server is unavailable, it will retry the request twice more, but if it still can't reach cchost it will turn the orb yellow.

Installing the Service

Now that the orb is hooked up and you've got your color script written, here's how to install the service to make it go.

Put the files in place

Create a folder named C:\Program Files\AmbientOrb and copy everything in this .zip into it: AmbientOrbService.zip. Put your color script in the same folder.

Install the Service

You will need the script installOrbService.pl (or one like it) to install the AmbientBuild Windows Service on your host.


 1   #!perl
 2   use strict;
 3   use LWP::Simple;
 4
 5   my $color = getColor();
 6   print $color;
 7
 8   sub getColor {
 9       my $color = 6;
 10      for (my $retry = 0; $retry < 3; $retry++) {
 11          if ($color == 6) {
 12              sleep 1 if ($retry > 0);
 13              $color = getColorRequest();
 14          }
 15      }
 16      return $color;
 17  }
 18
 19  sub getColorRequest  {
 20      my $color;
 21      my $dashboard = get('http://cchost/ccnet');
 22      if ($dashboard) {
 23          if ($dashboard =~ />Fail/) { $color = 0; }
 24          else { $color = 24; }
 25      }
 26      else {
 27          $color = 6;
 28      }
 29      return $color;
 30  }

You only need to run this script once to install the service. It takes one argument: -i for install or -u for uninstall, then prints a short status message indicating whether the action was successful.

Line 14 points to the script that will be started when the Windows Service starts. That's our orbService.pl script. If you write your own Windows Service, you would put its pathname here, using the short pathname (with no spaces). If you fill out a username and password in lines 12-13, the script will run as that account. If you leave it blank, it will run as System.

Note that line 14 should contain the orbService.pl script as written, not your color script.

Configure the Service

The service looks for a file named orbService.config, which can have any of the following values. If a value is not specified, it will use the default listed.

KEY

Default Value

Description

colorScript

C:\Program Files\AmbientOrb\ccnetWeb.pl

prints orb color code to STDOUT

webOrbs

[n/a]

serial #s of other orbs, comma-separated, no trailing comma

port

COM1

serial port to use

logFile

C:\Program Files\AmbientOrb\orb.log

verbosity

1

0 = silent, ..., 3 = garrulous

maxLogLines

10000

maximum lines to leave in log file

pollingInterval

30000

wait between updating the orb (ms)

sleepTime

2000

between processing service messages (ms)

waitForStop

20000

how long to expect service stop to take (ms)

errorColor

0

color to use on colorScript error (0-36)

errorAnim

5

animation on colorScript error (0-9)

While the service is running, changes to this configuration file will be automatically loaded the next time the script checks its messages (within 2 seconds by default). If you leave the service configured as shown, it will run the ccnetWeb.pl script every 30 seconds.

Web Orbs

In my environment, we have three orbs and only two HDKs. The service is installed on both hosts with HDKs attached, but that leaves one orb out of the loop. To update it, one of the servers is also configured to update the orb using its webOrbs configuration parameter. This orb is updated using Ambient's Web Developer API.

Other uses

This service was written to make it easy to monitor anything using an Ambient Orb. With a different color script and polling interval, you could make it monitor just about anything. During testing I had it monitor hockey scores, crude oil prices, and network traffic (not all at the same time). If you do something like that, I'd like to hear about it, so please let me know.

#!perl
###########################
# installOrbService.pl
###########################
use Win32::Daemon;
my $svcName = 'AmbientBuild';
%Hash = (
    name    =>  $svcName,
    display =>  $svcName,
    description => 'Ambient Build Monitor',
    path    =>  'c:\\perl\\bin\\perl.exe',
    user    =>  '',
    pwd     =>  '',
    parameters =>'c:\\Progra~1\\AmbientOrb\\orbService.pl',
);

my $action = $ARGV[0];
if (lc($action) eq '-i') {
    if( Win32::Daemon::CreateService( \%Hash ) ) {
        print "Successfully added.\n";
    }
    else {
        print "Failed to add service: ",
         Win32::FormatMessage(Win32::Daemon::GetLastError()),
         "\n";
    }
}
elsif (lc($action) eq '-u') {
    if( Win32::Daemon::DeleteService( "", $svcName ) ) {
        print "Successfully removed.\n";
    }
    else {
        print "Failed to remove service: ",
         Win32::FormatMessage(Win32::Daemon::GetLastError()),
         "\n";
    }
}
else {
    print "Unknown action ",
    "(use -i for install, -u for uninstall).\n";
}

You only need to run this script once to install the service. It takes one argument: -i for install or -u for uninstall, then prints a short status message indicating whether the action was successful.

Line 14 points to the script that will be started when the Windows Service starts. That's our orbService.pl script. If you write your own Windows Service, you would put its pathname here, using the short pathname (with no spaces). If you fill out a username and password in lines 12-13, the script will run as that account. If you leave it blank, it will run as System.

Note that line 14 should contain the orbService.pl script as written, not your color script.

Configure the Service

The service looks for a file named orbService.config, which can have any of the following values. If a value is not specified, it will use the default listed.

KEY

Default Value

Description

colorScript

C:\Program Files\AmbientOrb\ccnetWeb.pl

prints orb color code to STDOUT

webOrbs

[n/a]

serial #s of other orbs, comma-separated, no trailing comma

port

COM1

serial port to use

logFile

C:\Program Files\AmbientOrb\orb.log

verbosity

1

0 = silent, ..., 3 = garrulous

maxLogLines

10000

maximum lines to leave in log file

pollingInterval

30000

wait between updating the orb (ms)

sleepTime

2000

between processing service messages (ms)

waitForStop

20000

how long to expect service stop to take (ms)

errorColor

0

color to use on colorScript error (0-36)

errorAnim

5

animation on colorScript error (0-9)

While the service is running, changes to this configuration file will be automatically loaded the next time the script checks its messages (within 2 seconds by default). If you leave the service configured as shown, it will run the ccnetWeb.pl script every 30 seconds.

Web Orbs

In my environment, we have three orbs and only two HDKs. The service is installed on both hosts with HDKs attached, but that leaves one orb out of the loop. To update it, one of the servers is also configured to update the orb using its webOrbs configuration parameter. This orb is updated using Ambient's Web Developer API.

Other uses

This service was written to make it easy to monitor anything using an Ambient Orb. With a different color script and polling interval, you could make it monitor just about anything. During testing I had it monitor hockey scores, crude oil prices, and network traffic (not all at the same time). If you do something like that, I'd like to hear about it, so please let me know.

Ambient Orb Setup

This page describes the process of hooking an Ambient Orb up to show a real-time information using the Ambient Hardware Developer's Kit.

Previous Work

The Orb provides a great, at-a-glance indication of build status for a continuously integrated software project. The subjects of Continuous Integration and its benefits are discussed in a number of other places, so I won't cover them here. Likewise, the use of an Orb using the Ambient Web API is covered admirably by Michael Swanson, so you can read that there.

Problems

The two problems I found were:

  1. Update lag

    The Ambient pager network does not change the color of an orb for 10 - 30 minutes. I can break a build in seconds. An ideal system would indicate the status of software builds in real time with no lag.

  2. Integration of multiple software projects

    I work in a shop that produces a lot of different projects at a time. We currently have eleven builds managed by CruiseControl.NET. Using NAnt events as described elsewhere did not provide an easy way to measure how many builds were successful moment-by-moment.

Solution

Lucky for me, the first problem can be solved with hardware. As a software guy, I love when that happens. Ambient produces a Hardware Developer's Kit. You put an Orb on one end and a serial port on the other, and you're in business: you can update the orb instantly to any color you like.

Unfortunately, the cable is only 3 feet long, making the orb's location a bit constrained. This was easily solved with a cheap 50-foot serial cable. As a bonus, the $45 (with shipping) HDK frees me from the $80/year subscription to Ambient's developer channel, so the hardware investment will pay for itself within the first year.

To have the Orb reflect the status of multiple software projects all at once, I polled the CruiseControl.NET server. For now, I'm using a screen scrape of the CruiseControl dashboard. With a little gumption, I could probably poll the same port that CCTray uses.

Keeping in mind that I might not always use CruiseControl as my CI solution, and that I might change the way I poll it for build status, I thought it would be nice to keep those changes insulated from the core orb updating service.

I'm a native speaker of Perl, so that's the language all of this is in. I used Win32::Daemon by Dave Roth to create a Windows service in Perl. The service talks on the serial port using Bill Birthisel's Win32::SerialPort package and updates the colors using my Win32::AmbientOrb package.

How to Do It Yourself

This Walkthrough describes how to set up the whole system.

Lazy Part 4

Part 4: Talking to Yahoo! Music Engine

So the remote has been programmed to impersonate a CD player remote, and the computer can detect when it's sending commands. Now I just need to actually do something with the commands.

Good News

When I installed Girder, I found out that it's already got a Yahoo! Music Engine plugin configured. It can handle Play, Pause, Stop, Skip, etc., so my initial goal of skipping Nickelback songs looks to be within easy reach. As a bonus, Girder also has plugins for WinAmp, Windows Media Player, and just about any other software you could be using to control your playlist.

To actually make use of Girder, you will need to visit each event in the included Yahoo! Music Engine GML and make usre it's listening for its events from the remote you just set up. Just visit the event you want to define: and double-click it to set its properties. When you get there, set the Event Device to the remote you just created:

Budget

After my initial investigation, I expected to spend just under $150 and 20 hours to get this done. I spent $143.44, so for once I was under budget. If you already have a universal remote that you like, you really could do this with just the UIRT and Girder ($103.60 with shipping). As far as time, there were two parts of this that went surprisingly smooth: Girder's YME plugin saved me hours of capturing commands, and the IrToWav software made it super easy to program the remote with exactly the right codes for all of my devices. I actually spent only 9 hours on this, and since I already found the parts and vendors, you could get through this exercise in even less time.

Next Steps

At this point, I have achieved my initial goal of being able to control my playlist using the same infrared remote I use for the rest of my stereo equipment. Along the way, some other interesting questions and challenges presented themselves. If I'm feeling particularly ambitious in the future I might plan to pursue one of these:

Changing Stations I might decide after skipping ten tracks in a row that maybe I'm just listening to the wrong station. It would be cool if I could set up a list of favorite channels or playlists and change to them with the remote.

RF Remote Control This setup works great in my living room where I'm already holding an infrared remote control (unless Blake has stolen it). But I have speakers on my back porch too and the IR remote doesn't really cope well with the sliding glass door. I live in Phoenix, so infrared opacity is important, and I'm not willing to change glass. An RF remote would solve this problem and free me from the line-of-sight requirement.

Breakeven Analysis

I know how much time and money I spent on this. I'm willing to ignore the money for now. A vanity website baron such as myself has little time for such material concerns anyway. The real scarce resource is time. I had my faithful assistant clock me while I made round trips to the computer and back to my seat skipping crappy music tracks. 13 seconds per trip, average. Then he clocked me using the remote: 2 seconds. That's a net time savings of 11 seconds per crappy music track.

I don't have data concerning the ratio of music I'll tolerate to music I won't, so we will work from a model. If each song is 3½ minutes long and 3% of them are crappy enough to be skipped, my 11 second advantage breaks down to .001571429 seconds saved per second that I listen to music, or about 5.7 seconds per hour. To look at it another way, I'll be hearing about 17 songs per hour, with a little more than one crappy song every two hours, but the song will only waste 2 seconds of my life, not 13.

If I listen to music for an average 30 minutes a day, it will only take me 191 listening days to break even on my 9 hour investment. I drove the golden spike uniting Yahoo! Music Engine and my remote on March 20, 2006. That means that on September 27, 2006, I will have regained all of the time spent putting this together. This is considerably more favorable than if it had taken 20 hours as I predicted at the beginning. That would have put my breakeven point at May 18, 2007. Still acceptable.

Summary in 10 Words or Less

Not as hard as I expected and totally worth it.

Final Budget: $143.44, 9 hours

Lazy Part 3

Part 3: Talking to the Computer

For my next trick, I'll need an assistant: the USB-UIRT. This is that gadget that's going to receive infrared signals from the remote. I'll also need the Girder software to learn the codes my remote is sending and actually do something with them. For now, I'm just going to be satisfied with proving that my PC is hearing what the remote is saying. Making the software do anything about it is a matter for another day.

I'll only be needing a handful of buttons here. They're all standard play controls and appear on just about any remote.

  • Power (to open or bring focus to the application)
  • Play/Pause
  • Stop
  • Previous Track
  • Next Track
  • Shuffle
  • Repeat

Hardware Installation

Dude. That couldn't have gone much easier. Plug in the UIRT and the Plug and Play dialog finds it. You download the drivers from the USBUIRT site and tell the PnP wizard where to find them. Done.

Software Installation

This was also a cakewalk. Come to think of it, it was much easier than a cakewalk. I've participated in several of those and never walked away with a thing. Here there is no cake, but at least I have something to show for my effort.

Telling Girder About It

Go to File -> Settings, select "Plug-in settings," and check the box next to "USB-UIRT." Restart Girder and you're off & running.

Setting Up Your Remote

Go to Tools -> Add Remote Wizard. Click Next, name the remote, then start programming. It asks you to press any button to make sure it detects a remote at all, then it asks you to press each button that you want to use on the remote. After you finish this, Girder will be able to get signals from your remote.

All of this only took me an hour, and most of that was poking around trying to figure out what else Girder could be used for. I went ahead and picked buttons to use for song rating too. If everything goes smooth, I'll not only be able to skip sucky tracks, but ban them for good measure. Next, I'm going to make Girder listen for the signals from my remote.

Budget update: $143.44, 8 hours.

Lazy Part 2

Part 2: Programming the Remote

I got the remote control in the mail today. It's a beautiful, silver OneForAll 8910.

Just to get things warmed up, I found the code for my TV and entered it. I got that up and running right away. Early win. Nice.

Uncharted Territory

I tried out the IR.exe and Remote Master software. It turns out there's one more handy piece of software, IrToWav. I'll explain that in a minute.

In brief, Remote Master creates the key mapping for the remote (which button should send what signal), IR.exe converts that map to a binary file the remote can understand, and IrToWav generates a .wav file that can load the upgrade to the remote.

How slick is that? The remote has a modem in it for one-way uploads of information. If you call OneForAll technical support, they can have you hold your remote up to the phone and load new devices and protocols. If you use IrToWav, you can do the same thing, but with a custom program you created. You don't even need the JP-1 cable to write to this remote.

There's a great tutorial on all of this on the hifi-remote site, and another good one here. The hifi-remote forums are also a gold mine of great information. If you just take two hours to read the sticky posts in the beginner forums and search for your particular remote, you'll be a beginner no longer.

To control the music player on my PC, I just selected a common universal code for a CD player (for some reason, code 0157 is used for 16 different CD players in my remote's catalog, but not for mine). I figure choosing a common code means there's a low probability that its carrier signal will be out of range for my IR receiver or some other nonsense. I plan to use these play controls to manipulate the Music Engine on my screen. I must say that this step of the process went smoother than I could have imagined. The remote is already controlling my whole home entertainment system (except PC), and I had a super-easy graphical interface to remap all of the buttons.

I didn't need the $14 JP-1 Cable to do this, but since I already ordered it, I'm adding it to the budget. I'll use it later when I'm in a nerdy mood.

Budget update: $39.84, 7 hours

A Different Kind of Lazy

All is not as it should be with the world. When I'm on my sofa listening to Launchcast, I'm subjected to Nickelback songs. That's no way to live, and I'm willing to go to the very gates of hell and back to avoid walking 15 feet to hit the "Skip" button every time it happens.

The problem

Back when you had a TV that looked like this:

if you didn't like what was on, you just had to wait it out or get up. Wiser minds than mine realized early that this situation was untennable.

In June of 1956, the first consumer wireless remote control entered the home. It may be just coincidence that this came two months after As the World Turns was introduced on CBS.

Fastforward 50 years.

Now, an increasing amount of my entertainment content comes from my PC, not an audio component sitting with my television. When I'm listening to Yahoo Music Engine and their Launchcast station tries to pawn some Nickelback off on me, I have to get up and skip the track by hand.

This shall not stand.

My Goal

I'm going to use the same infrared remote control I use for my home entertainment system to interact with the Yahoo Music Engine on my PC. It won't be easy, and the fact is, I'll spend more time putting this system together than I would have spent walking over to the computer to skip Nickelback songs over the next year.

If you don't get why I would do this, stop reading here because it's not going to get any better.

Along the way I'll keep track of how much time and money I'm spending to get this done. At the end, I'll have a parts list and step-by-step plans to make this dream a reality in your own home.

The parts list so far

  • USB-UIRT with shipping, $53.61 from Promixis This is the hardware that is going to receive infrared signals from the remote and set events in motion.
  • Girder 4, $49.99 from Promixis This is the Windows automation software that's going to listen for the remote and take all the right actions. I have never worked with it before, so I don't know what techniques will be available for interacting with the target application. There seems to be some support in there for locating windows by title and such (maybe I can just wire it up to automatically press the "Skip" button if "Nickelback" appears in the title bar), and if mouse spoofing doesn't pan out, YME has a developer API that might be useful. We'll see.
  • One for All URC 8910 Universal Remote Control and 4 AAA batteries, $25.85 from Amazon (optional) This will command my whole array of audio/video equipment, as well as the PC. If you have any universal remote, it will work. I got this one because my old "universal" remote couldn't control my DVD player, but this one's got that sweet JP-1 port so I can program it with custom codes. Now there's no such thing as an infrared device I can't control.
  • JP-1 Cable 13.99 from DIY Gadget (optional) This is used to program the remote control. I could get by without this if I used the built-in (and super cool) modem updater, but... it's a gadget. Besides, if $14 is going to break the bank, maybe you should consider another hobby.
  • IR.exe free download from Hi-Fi Remote (optional) This will be used to write data to the remote over the JP-1 cable. You can skip this if you're not going to be buying the JP-1 cable or getting that picky about your key mapping.
  • Remote Master free download from Hi-Fi Remote (optional) This works in conjunction with IR.exe and provides a graphical interface to remap keys on the remote. Naturally, you can skip this part if you're going to skip the previous two items.
  • IrToWav free download from Hi-Fi Remote (optional) This can program an equipped OneForAll remote (like mine) without the JP-1 cable. I'm still going with the JP-1 cable because I want to be able to read programs from the remote as well as write them.

Cost

I expect to spend a little less than $150 (including shipping). I have spent 5 hours finding options and selecting all of these purchases. I expect I'll spend about 20 hours by the time this is over. I will add items to the total expenses as they arrive.

Budget update: $0.00, 5 hours

A Holiday Message of Meat

orHow the Messenger Bag SavedAndy from the parking nightmare at Whole Foods onChristmasEve

Our holiday tale begins at my house, nestled among the quaint & rustic trailer parks of north Phoenix. A beef tenderloin roast awaits at Whole Foods, a mere 10 miles away. The journey will be perilous, but the reward will be a holiday message of meat, delivered in a genuine Timbuk2 messenger bag.

Continuing a long tradition, I get lost in Paradise Valley. Having lived in the Phoenix area for more than five years now, and bicycled through Paradise Valley more times than I can count, my inability to successfully navigate the area stands as a testament to the warped sense of humor shared by the town planners. Either that or I'm a total dumbass. Either way, I'm not going to let the eccentricities of PV's geography keep my message of meat from reaching the holiday table. Here's a sample of the kind of fun I'm talking about:

I eventually give up on the messy side streets of PV and initiate a Banzai Run. The logic of a Banzai run goes like this: If I keep backtracking on these side streets, I'll eventually dehydrate and starve to death. I'll lose so much weight that even spandex won't cling to my emaciated bones. I'll be remembered only as a starved, naked corpse with a kick-ass messenger bag. My message of meat will go undelivered, and Christmas will forever be remembered as a tragic day in my family. But I'm not going to let that happen to me; oh, no. I'm gonna' point my bike down the busiest road I can find. One that I know doesn't dead end at a golf course or change directions at a community library. I'm going to ride Tatum. The trick will be not getting hit by all those SUVs. So before I turn onto Tatum, I'll take a deep breath and yell "BANZAI!!!!" Then I'll accelerate as close to the speed of the cars as I can (about 29 mph on this day) and at least if they hit me it'll only be with a closing speed of 25 mph or so. Best outcome: I get out of PV alive. Worst outcome: I die, but very quickly instead of withering away at the corner of Mockingbird Lane and Mockingbird Lane. I always use a Banzai Run to get out of PV.

Finally, I meet the meat. I ask the butcher for an ice pack, but they don't have any nifty, self-contained ones; just crushed ice. Not a dry cold pack, but stuff that turns wet at 33°F. The ride home has to be quick.

35 min. and one Banzai Run along Cactus Road later, I arrive home, the meaty cargo safely delivered to its destination. The messenger bag performed admirably, showing a much greater load-bearing capacity in the face of this beefy payload than my shoulders (which are still a touch sore).

The colors of the messenger bag tell the story: Brown for the deep chestnut of a perfectly roasted tenderloin, red for the garnet hue of the zinfandel that complemented its meaty succulence, and black for everything that happened after the fifth bottle of zinfandel (I'm told it was memorable).

What You Missed

What You Missed By Slacking on Sunday

0 miles

Est. Temp: 85° F

05:00: It's still dark. Trucks are parked near Pima & Pinnacle Peak. Sunglasses are tucked in helmet vents (just like they do it in Europe), and the ride is underway. Spirits are high and the feeling of invincibility is palpable.

An easy warm-up gets things started:

6 miles

Est. Temp: 86° F

After a quick 700 foot climb, it's time to get down to some cycling. Having reached the summit after only 6 miles, Jayson and Andy figure the rest is really just academic.

7 miles, 4384 ft.

Est. Temp: 86° F

Andy (maybe a touch drowsy from the early hour and lack of breakfast) hits a bump so hard his water bottle falls out and his GPS shuts down.

20 miles

Est. Temp: 89° F

Jayson says "Let's stop at that gas station, I gotta’ take a leak." Buys more Gatorade, does not take leak. Warm, yellow Gatorade in clear water bottle taunts Jayson's bladder for the next few hours.

29 miles

Est. Temp: 90° F

Realizing neither rider had looked at a map, Andy and Jayson take turns trying to find a better road to ride on than Shea. Estimated distance added: 1 mi.

32 miles

Est. Temp: 90° F

An anonymous woman with a friendly dog named Cody decides she's hot, borrows Jayson's cell phone to call for a ride. Jayson will later comment on the surprising durability of said woman's skin care product(s) and/or secretions when applied to surfaces of phone. Good deed done and cell phone greased, both riders set off in search of Sweetwater, the road Andy knows goes to Cave Creek Road eventually.

35 miles

Est. Temp: 90° F

After reminding Andy that Sweetwater does not cross the 101, Jayson engineers a way back to Sweetwater via Raintree. Estimated distance added: 2 mi.

42 miles

Est. Temp: 91° F

Andy remembers something about having to go around PV Mall, but has not, to date, executed the navigational maneuver successfully. Jayson withholds commentary regarding Andy's navigational skills and general level of preparedness. A couple of backtracking loops see the intrepid explorers through to Sweetwater once again. Estimated distance added: 1 mi.

59 miles

Est. Temp: 94° F

The climb back to the trucks has begun. Andy asks Jayson "Is it hot out here or is it just me?"

62 miles

Est. Temp: 204° F

The climb continues. Andy asks Jayson "Is it cold out here or is it just me," implores hypothalamus to regulate temperature for just a few more miles. Hypothalamus reminds him it wasn't his limbic system's idea to get out of bed at 04:00, and tells him to pack sand.

67 miles

Est. Temp: 95° F

Back at the trucks. After a liter of cold water and a pint of iced coffee, Andy and his hypothalamus are on speaking terms again. Jayson withholds commentary on Andy's tendency to converse with his autonomic nervous system.

Now that you've seen the kind of fun you missed, you'll think twice before skippin' the ol' mornin' ride.